How to Setup IKEv2 VPN Server with StrongSwan on CentOS 8
Strongswan is an IPSec implementation that's open source and works, across multiple platforms. It serves as a VPN solution based on IPSec with an emphasis on robust authentication mechanisms. Strongswan provides support for both IKEv1 and IKEv2 exchange protocols allowing authentication, via certificates or pre shared keys. Additionally it ensures user authentication through IKEv2 EAP.
Installing IKEv2 on CentOS 8 Linux server is easy, here we will guide you how to setup and configure IKEv2 VPN server on CentOS.
For this installation, you'll require:
- CentOS 8 Server - Get your CentOS VPS now, if you don't already have one.
- Server Root Privileges.
Step 1 – Install StrongSwan on CentOS 8 Server
In the first step, we have to install the strongswan IPSec software and all packages needed from the EPEL repository.
Install the EPEL repository and install the strongswan package using the commands below.
sudo dnf install epel-release
sudo dnf install strongswan
Step 2 – Generate a SSL Certificate using Let's Encrypt Certification Authority
After the StrongSwan installation, we're going to create the IKEv2 VPN server using a domain name 'vpn.euro-space.net' and use certificates generated by letsencrypt.
First, we will install the Let's Encrypt tool 'certbot' manually and generate certificates for the server domain name 'vpn.euro-space.net'.
Download the certbot binary file from GitHub using the wget command below.
wget https://dl.eff.org/certbot-auto -O /usr/local/bin/certbot-auto
Next, make that file an executable by changing the permissions:
chmod +x /usr/local/bin/certbot-auto
The certbot tool has been installed and ready to generate Let's Encrypt certificates.
Before generating the certificates, we need to open the HTTP and HTTPS ports of the server using firewall-cmd.
Add the HTTP and HTTPS services to the firewalld service list by running firewall-cmd commands below.
firewall-cmd --add-service=http --permanent
firewall-cmd --add-service=https --permanent
firewall-cmd --reload
Let's start with the SSL certificate generation by using the certbot-auto tool.
Change the email address and the domain name with your own and run the 'certbot-auto' command below:
certbot-auto certonly --rsa-key-size 2048 --standalone --agree-tos --no-eff-email --email support@euro-space.net -d vpn.euro-space.net
Once generation completed, you will get "fullchain.pem" and "privkey.pem" files. Please note that all certificates of your domain name are generated and stored into the '/etc/letsencrypt/live/domain.com' directory.
Next, we need to copy the certificate files 'fullchain.pem', 'privkey.pem', and the 'chain.pem' to the '/etc/strongswan/ipsec.d/' directory.
cp /etc/letsencrypt/live/vpn.euro-space.net/fullchain.pem /etc/strongswan/ipsec.d/certs/
cp /etc/letsencrypt/live/vpn.euro-space.net/privkey.pem /etc/strongswan/ipsec.d/private/
cp /etc/letsencrypt/live/vpn.euro-space.net/chain.pem /etc/strongswan/ipsec.d/cacerts/
We can check that all Let's Encrypt certificates for the Strongswan VPN named 'vpn.euro-space.net' have been generated and copied to the '/etc/strongswan/ipsec.d' directory:
tree /etc/strongswan/ipsec.d/
Step 3 – How to configure StrongSwan
Navigate to the '/etc/strongswan' folder and backup the default 'ipsec.conf 'configuration file:
cd /etc/strongswan/
mv ipsec.conf ipsec.conf.backup
Create a new file 'ipsec.conf' using the vim (or other favourite) editor:
vim ipsec.conf
Then paste the following configuration commands:
config setup
    uniqueids=never # allow multiple connections per user
    charondebug="ike 2, knl 2, cfg 2, net 2, esp 2, dmn 2,  mgr 2"

conn %default
    fragmentation=yes
    closeaction=restart
    rekey=no
    dpdaction=clear
    keyexchange=ikev2
    compress=yes
    dpddelay=35s
    lifetime=3h
    ikelifetime=12h

    ike=aes256gcm16-prfsha512-ecp384!
    esp=aes256gcm16-ecp384!

    left=%any
    leftid=@vpn.euro-space.net
    leftcert=fullchain.pem
    leftsendcert=always
    leftsubnet=0.0.0.0/0

    right=%any
    rightid=%any
    rightauth=eap-mschapv2
    rightsourceip=10.15.1.0/24
    rightdns=1.1.1.1,8.8.8.8
    rightsendcert=never
    eap_identity=%identity

conn ikev2-pubkey
    auto=add
Save file and exit.
After that, we need to edit the 'ipsec.secrets' file to define the RSA server private key and EAP user password credentials.
Open and edit the 'ipsec.secrets' file:
vim ipsec.secrets
Copy here and paste the following configuration below:
: RSA "privkey.pem"
hakase : EAP "hakase321@"
tensai : EAP "tensai321@"
Save the file and exit.
Now, the Strongswan IPSec setup and configuration have been completed. Add the strongswan service to the startup time and then start the service:
systemctl enable strongswan
systemctl start strongswan
The Strongswan service is up and running on your CentOS 8 server, check it using the following command:
systemctl status strongswan
netstat -plntu
Step 4 – Enable NAT in Firewalld
Now, we're going to enable the NAT masquerading and add the IPSec protocols Authentication Header (AH) and Encapsulating Security Payload (ESP) on Firewalld using the 'rich-rule' configuration.
Add 'AH' and 'ESP' for authentication and encryption protocols to the firewalld:
firewall-cmd --zone=public --permanent --add-rich-rule='rule protocol value="esp" accept'
firewall-cmd --zone=public --permanent --add-rich-rule='rule protocol value="ah" accept'
Add the ipsec UDP ports and service:
firewall-cmd --zone=public --permanent --add-port=500/udp
firewall-cmd --zone=public --permanent --add-port=4500/udp
firewall-cmd --zone=public --permanent --add-service="ipsec"
Then enable the NAT mode masquerade and reload the firewalld configuration rules:
firewall-cmd --zone=public --permanent --add-masquerade
firewall-cmd --reload
Once the NAT mode on firewalld has been enabled, you can check it using the command below:
firewall-cmd --list-all
Step 5 – Enable Port Forwarding
To enable port-forwarding, we need to edit the 'sysctl.conf' file.
Open the '/etc/sysctl.conf' file using vim (or other) editor and edit it:
vim /etc/sysctl.conf
Then copy and paste the following configuration there:
net.ipv4.ip_forward = 1
net.ipv4.conf.all.accept_redirects = 0
net.ipv4.conf.all.send_redirects = 0
Save the file and exit, then reload using the sysctl command:
sysctl -p
Port-forwarding has been enabled. Now we have to restart the strongswan service:
systemctl restart strongswan
Step 6 – Test the StrongSwan IPSec VPN
We'll perform tests on the MacOS X and Android phone.
On MacOS X
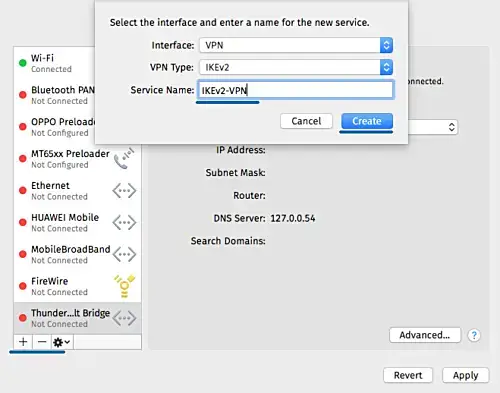
- Open the 'System Preferences' and click the 'Network' menu.
Click the '+' button to create a new VPN connection.
- Interface: 'VPN'
- VPN Type: 'IKEv2'
- Service Name: 'IKEv2-vpn
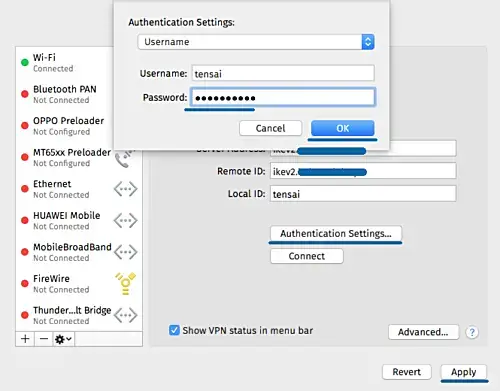
- On the 'Server Address' and 'Remote ID', type the VPN domain name 'ikev2.euro-space.net'.
- Click 'Authentication Settings'.
- Authentication using a 'Username'.
- Type the username 'tensai' with password 'tensai321@'
- Click 'OK' and click 'Apply'.
The new IKEv2 VPN connection has been created for the client. Next, click the connect button:
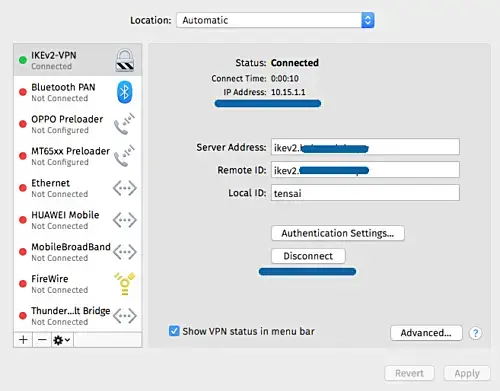
You'll see the VPN client is now connected to the Strongswan VPN server and has an internal/private IP address 10.15.1.1.
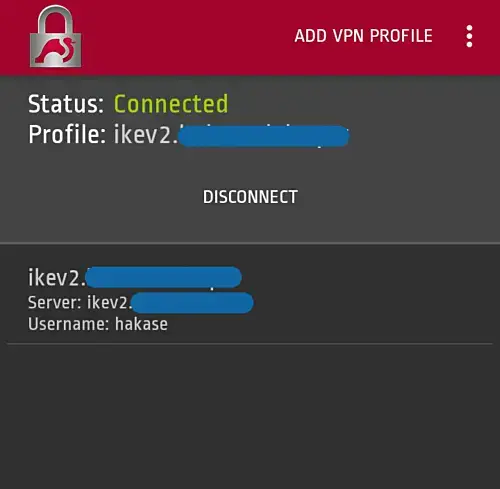
On the Android Device
- Download and install the native Strongswan Android application from Google Play.
- Add new VPN profile
- Type the server domain name 'ikev2.euro-space.net and use the IKEv2 EAP Username and Password authentication.
When we connect to the VPN server, it will look like the image below:
Now we have created the IKEv2 IPSec based VPN server using Strongswan and Let's Encrypt on Linux CentOS 8 server.
Published on: 30-08-2023


