How to Install OpenVPN server on Ubuntu 20.04 for Free
OpenVPN is a full featured and open-source Transport Layer Security (TLS) VPN solution that accommodates a wide range of configurations. A VPN allows you to connect securely to an insecure public network such as wifi network at the airport or hotel. In many enterprises and government offices, VPN is needed to access your corporate server resources. In this tutorial, we'll go through how to install OpenVPN on an Ubuntu 20.04 server, and then configure it to be accessible from a client device.
Prerequisites
- Get reliable VPS or VDS hosting plan, or a Dedicated Server with Ubuntu 20.04 LTS
- Full root access to the server OS
Step 1 – Update Ubuntu OS
Make sure your system is up to date by running following SSH commands:
sudo apt update
sudo apt upgrade
Step 2 – Find and note down your IP address
Use the ip SSH command as follows:
ip a
ip a show eth0
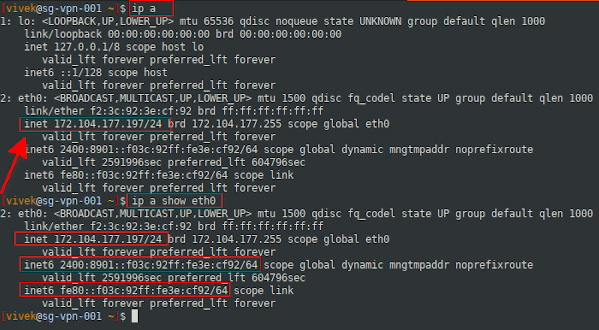
A note about IP address assigned to your server
Most virtual private servers (VPS), Virtual dedicated servers (VDS) and bare-metal servers have two types of IP address provided by the datacenter:
- Public static IP address directly assigned to your machine and routed from the Internet. For example, after signing up to our server hosting plan, we give you the direct public IP address.
- Private static IP address directly attached to your server and your server is behind NAT with public IP address. For example, AWS gives you this kind of NAT public IP address.
The script will automatically detect your networking setup. All you have to do is provide a correct IP address when asked for it.
Step 3 – Download and run OpenVPN installer script
We'll use the wget SSH command to grab the installer script and download locally:
wget https://git.io/vpn -O openvpn-ubuntu-install.sh
Important Note: If you want password authentication functionality along with the security certificates, try downloading and running the following:
wget https://raw.githubusercontent.com/angristan/openvpn-install/master/openvpn-install.sh -O openvpn-ubuntu-install.sh
Once the script downloaded it is time to make it executable. Set up the correct permissions using the chmod command to run script:
chmod -v +x openvpn-ubuntu-install.sh
Run the installer script to setup OpenVPN server
Simply run the following SSH command to start installation:
sudo ./openvpn-ubuntu-install.sh
Follow the installation instructions on the screen and apply recommended default settings to your setup.
Important Note: If you have downloaded installation script with password authentication , then you can add a Name of VPN Client (e.g. "Tell me a name for the client.") - write any name such as "linuxdesktop", then on "Do you want to protect the configuration file with a password?" select an option 2 "Use a password for the client" - You will be asked to enter the new client password.
We recommend that you always choose the DNS server option as 1.1.1.1 and 1.0.0.1 or Google DNS or any other DNS service provided that you trust as per your needs. Make sure you choose fast Geo-distributed DNS servers and reached from anywhere on the Internet.
At the end we should see the following information:
Your client configuration is available at: /root/linuxdesktop.ovpn
If you want to add more clients, just run this script again!
How to start/stop/restart OpenVPN server on Ubuntu 20.04 LTS?
We have to use the systemctl SSH command as follows:
Stop the OpenVPN server
sudo systemctl stop openvpn-server@server.service
## OR when using password to protect vpn ##
sudo systemctl stop openvpn@server.service
Start the OpenVPN server
sudo systemctl start openvpn-server@server.service
## OR when using password to protect vpn ##
sudo systemctl start openvpn@server.service
Restart the OpenVPN server after changing configuration options
sudo systemctl restart openvpn-server@server.service
## OR when using password to protect vpn ##
sudo systemctl restart openvpn@server.service
Show status of the OpenVPN server
sudo systemctl status openvpn-server@server.service
## OR when using password to protect vpn ##
sudo systemctl status openvpn@server.service
That will show the status information:
● openvpn-server@server.service - OpenVPN service for server
       Loaded: loaded (/lib/systemd/system/openvpn-server@.service; enabled; vendor preset: enabled)
       Active: active (running) since Tue 2022-06-16 09:01:19 UTC; 4min 39s ago
       Docs: man:openvpn(8)
             https://community.openvpn.net/openvpn/wiki/Openvpn24ManPage
             https://community.openvpn.net/openvpn/wiki/HOWTO
       Main PID: 1982 (openvpn)
       Status: "Initialization Sequence Completed"
       Tasks: 1 (limit: 2282)
       Memory: 1.1M
       CGroup: /system.slice/system-openvpn\x2dserver.slice/openvpn-server@server.service
               └─1982 /usr/sbin/openvpn --status /run/openvpn-server/status-server.log --status-version 2 --suppress-timestamps --config server.conf

Jun 16 09:01:19 sg-vpn-001 openvpn[1982]: Socket Buffers: R=[212992->212992] S=[212992->212992]
Jun 16 09:01:19 sg-vpn-001 openvpn[1982]: UDPv4 link local (bound): [AF_INET]172.104.177.197:1194
Jun 16 09:01:19 sg-vpn-001 openvpn[1982]: UDPv4 link remote: [AF_UNSPEC]
Jun 16 09:01:19 sg-vpn-001 openvpn[1982]: GID set to nogroup
Jun 16 09:01:19 sg-vpn-001 openvpn[1982]: UID set to nobody
Jun 16 09:01:19 sg-vpn-001 openvpn[1982]: MULTI: multi_init called, r=256 v=256
Jun 16 09:01:19 sg-vpn-001 openvpn[1982]: IFCONFIG POOL IPv6: (IPv4) size=252, size_ipv6=65536, netbits=64, base_ipv6=fddd:1194:1194:1194::1000
Jun 16 09:01:19 sg-vpn-001 openvpn[1982]: IFCONFIG POOL: base=10.8.0.2 size=252, ipv6=1  Jun 16 09:01:19 sg-vpn-001 openvpn[1982]: IFCONFIG POOL LIST
Jun 16 09:01:19 sg-vpn-001 openvpn[1982]: Initialization Sequence Completed
Step 4 – Connect to OpenVPN server
You can connect your OpenVPN server using iOS, Android, MacOS (OS X) or Windows Desktop Client.
Once you setup OpenVPN server, the client configuration file will be placed under /root/linuxdesktop.ovpn . All you have to do is copy this file to your local desktop using the scp command (replace 172.104.177.197 with your server's actual IP address):
scp root@172.104.177.197:/root/linuxdesktop.ovpn .
If root is not allowed to log in into the server, try the following SSH command:
ssh username@172.104.177.197 "sudo -S cat /root/linuxdesktop.ovpn" > linuxdesktop.ovpn
Note for Windows user: You may have to download scp / sFTP clients such as FileZilla or WinSCP to login to your server and copy the .ovpn file to your Windows machine. Some versions of windows may come with both ssh/sftp/ssh clients.
If unable to bind service to a VPN port
It would help if you force Linux to bind an IP address that doesn’t exist with net.ipv4.ip_nonlocal_bind Linux kernel option. For example, during Ubuntu 20.04 LTS startup (boot) time, OpenVPN IP addresses such as 10.8.0.1/32 may not be available to services such as HTTPD or SSHD. Edit the following file:
sudo nano /etc/sysctl.d/1000-force-openvpn-bind.conf
## OR when using password to protect vpn ##
sudo vim /etc/sysctl.d/1000-force-openvpn-bind.conf
Append the following line:
net.ipv4.ip_nonlocal_bind=1
Reload changes using the sysctl command:
sudo sysctl -p /etc/sysctl.d/1000-force-openvpn-bind.conf
Linux Desktop: OpenVPN client configuration
First, install the openvpn client for your desktop using the yum command/dnf command/apt command:
sudo apt install openvpn
OR:
sudo dnf install openvpn
Next, copy desktop.ovpn with following SSH command:
sudo cp linuxdesktop.ovpn /etc/openvpn/client.conf
Test connectivity from the CLI:
sudo openvpn --client --config /etc/openvpn/client.conf
Your Linux system will automatically connect when computer restart using openvpn script/service:
sudo systemctl start openvpn@client # <--- start client service
Step 5 – Verify and test the connectivity
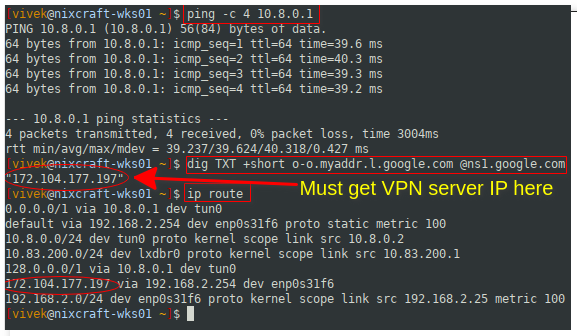
Simply visit this page to check your IP address and it will show up the changed IP address by your VPN server. Next, execute the following commands after connecting to OpenVPN server from your desktop client:
ping 10.8.0.1 # Ping to the OpenVPN server gateway
ip route # Make sure routing setup working
## the following must return public IP address of OpenVPN server ##
dig TXT +short o-o.myaddr.l.google.com @ns1.google.com
Step 6 – How to add or remove a new VPN user with a certificate
You will need to run the same script again for adding or removing a new VPN user to TLS certificate. For instance:
sudo ./openvpn-ubuntu-install.sh
You will see the following installation menu:
OpenVPN is already installed.
Select an option:
     1) Add a new client
     2) Revoke an existing client
     3) Remove OpenVPN
     4) Exit

Option:
Choose option 1) to add a new VPN client/user and option 2) to remove the existing VPN client and user.
A note about troubleshooting OpenVPN server and client issues
Type the following SSH commands in your Ubuntu terminal. First, check OpenVPN server for errors:
sudo journalctl --identifier openvpn
-- Logs begin at Tue 2020-06-16 08:53:36 UTC, end at Tue 2020-06-16 09:09:57 UTC. --
Jun 16 09:01:19 sg-vpn-001 openvpn[1982]: OpenVPN 2.4.7 x86_64-pc-linux-gnu [SSL (OpenSSL)] [LZO] [LZ4] [EPOLL] [PKCS11] [MH/PKTINFO] [AEAD] built on Sep  5 2019
Jun 16 09:01:19 sg-vpn-001 openvpn[1982]: library versions: OpenSSL 1.1.1f  31 Mar 2020, LZO 2.10
Jun 16 09:01:19 sg-vpn-001 openvpn[1982]: Diffie-Hellman initialized with 2048 bit key
Jun 16 09:01:19 sg-vpn-001 openvpn[1982]: Outgoing Control Channel Encryption: Cipher 'AES-256-CTR' initialized with 256 bit key
Jun 16 09:01:19 sg-vpn-001 openvpn[1982]: Outgoing Control Channel Encryption: Using 256 bit message hash 'SHA256' for HMAC authentication
Jun 16 09:01:19 sg-vpn-001 openvpn[1982]: Incoming Control Channel Encryption: Cipher 'AES-256-CTR' initialized with 256 bit key
Jun 16 09:01:19 sg-vpn-001 openvpn[1982]: Incoming Control Channel Encryption: Using 256 bit message hash 'SHA256' for HMAC authentication
Jun 16 09:01:19 sg-vpn-001 openvpn[1982]: TUN/TAP device tun0 opened
Jun 16 09:01:19 sg-vpn-001 openvpn[1982]: TUN/TAP TX queue length set to 100
Jun 16 09:01:19 sg-vpn-001 openvpn[1982]: /sbin/ip link set dev tun0 up mtu 1500
Jun 16 09:01:19 sg-vpn-001 openvpn[1982]: /sbin/ip addr add dev tun0 10.8.0.1/24 broadcast 10.8.0.255
Jun 16 09:01:19 sg-vpn-001 openvpn[1982]: /sbin/ip -6 addr add fddd:1194:1194:1194::1/64 dev tun0
Jun 16 09:01:19 sg-vpn-001 openvpn[1982]: Could not determine IPv4/IPv6 protocol. Using AF_INET
Jun 16 09:01:19 sg-vpn-001 openvpn[1982]: Socket Buffers: R=[212992->212992] S=[212992->212992]
Jun 16 09:01:19 sg-vpn-001 openvpn[1982]: UDPv4 link local (bound): [AF_INET]45.79.125.234:1194
Jun 16 09:01:19 sg-vpn-001 openvpn[1982]: UDPv4 link remote: [AF_UNSPEC]
Jun 16 09:01:19 sg-vpn-001 openvpn[1982]: GID set to nogroup
Jun 16 09:01:19 sg-vpn-001 openvpn[1982]: UID set to nobody
Jun 16 09:01:19 sg-vpn-001 openvpn[1982]: MULTI: multi_init called, r=256 v=256
Jun 16 09:01:19 sg-vpn-001 openvpn[1982]: IFCONFIG POOL IPv6: (IPv4) size=252, size_ipv6=65536, netbits=64, base_ipv6=fddd:1194:1194:1194::1000
Jun 16 09:01:19 sg-vpn-001 openvpn[1982]: IFCONFIG POOL: base=10.8.0.2 size=252, ipv6=1
Jun 16 09:01:19 sg-vpn-001 openvpn[1982]: IFCONFIG POOL LIST
Jun 16 09:01:19 sg-vpn-001 openvpn[1982]: Initialization Sequence Completed
Are the firewall rules setup correctly on the server? Use the cat SSH command to see the rules:
sudo cat /etc/systemd/system/openvpn-iptables.service
## OR when using password to protect vpn ##
sudo cat /etc/systemd/system/iptables-openvpn.service
Current configuration would look like this:
[Unit]
Before=network.target
[Service]
Type=oneshot
ExecStart=/sbin/iptables -t nat -A POSTROUTING -s 10.8.0.0/24 ! -d 10.8.0.0/24 -j SNAT --to 172.104.177.197
ExecStart=/sbin/iptables -I INPUT -p udp --dport 1194 -j ACCEPT
ExecStart=/sbin/iptables -I FORWARD -s 10.8.0.0/24 -j ACCEPT
ExecStart=/sbin/iptables -I FORWARD -m state --state RELATED,ESTABLISHED -j ACCEPT
ExecStop=/sbin/iptables -t nat -D POSTROUTING -s 10.8.0.0/24 ! -d 10.8.0.0/24 -j SNAT --to 172.104.177.197
ExecStop=/sbin/iptables -D INPUT -p udp --dport 1194 -j ACCEPT
ExecStop=/sbin/iptables -D FORWARD -s 10.8.0.0/24 -j ACCEPT
ExecStop=/sbin/iptables -D FORWARD -m state --state RELATED,ESTABLISHED -j ACCEPT
ExecStart=/sbin/ip6tables -t nat -A POSTROUTING -s fddd:1194:1194:1194::/64 ! -d fddd:1194:1194:1194::/64 -j SNAT --to 2400:8901::f03c:92ff:fe3e:cf92
ExecStart=/sbin/ip6tables -I FORWARD -s fddd:1194:1194:1194::/64 -j ACCEPT
ExecStart=/sbin/ip6tables -I FORWARD -m state --state RELATED,ESTABLISHED -j ACCEPT
ExecStop=/sbin/ip6tables -t nat -D POSTROUTING -s fddd:1194:1194:1194::/64 ! -d fddd:1194:1194:1194::/64 -j SNAT --to 2400:8901::f03c:92ff:fe3e:cf92
ExecStop=/sbin/ip6tables -D FORWARD -s fddd:1194:1194:1194::/64 -j ACCEPT
ExecStop=/sbin/ip6tables -D FORWARD -m state --state RELATED,ESTABLISHED -j ACCEPT
RemainAfterExit=yes
[Install]
WantedBy=multi-user.target
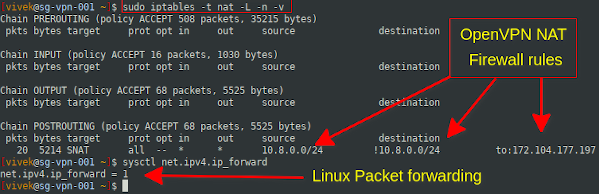
Another option is to run iptables SSH command and sysctl command to verify NAT rule setup on your server:
sudo iptables -t nat -L -n -v
sysctl net.ipv4.ip_forward
sudo cat /etc/sysctl.d/30-openvpn-forward.conf
## OR when using password to protect vpn ##
sudo cat /etc/sysctl.d/99-openvpn.conf
Insert the appropriate firewall rules if not yet done by using the following command:
sudo systemctl start openvpn-iptables.service
## OR when using password to protect vpn ##
sudo systemctl start iptables-openvpn.service
sudo sysctl -w net.ipv4.ip_forward=1
sudo sysctl -p -f /etc/sysctl.d/30-openvpn-forward.conf
## OR when using password to protect vpn ##
sudo sysctl -p -f /etc/sysctl.d/99-openvpn.conf
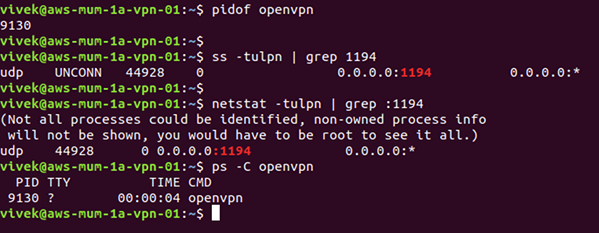
To check if OpenVPN server is running and port is open, try the ss command or netstat command and pidof command or ps command:
## 1194 is the openvpn server port ##
netstat -tulpn | grep :1194
## 1194 is the openvpn server port ##
ss -tulpn | grep :1194
## is the openvpn server running? ##
ps aux | grep openvpn
## is the openvpn server running? ##
ps -C openvpn
## find the openvpn server PID ##
pidof openvpn
If OpenVPN is not running, restart the server:
sudo systemctl restart openvpn-server@server.service
Checko out if there're any errors:
sudo systemctl status openvpn-server@server.service
Is the OpenVPN configured correctly to accept desktop client connections? Run a simple test to see if the OpenVPN server port (UDP 1194) is open for connections:
nc -vu 172.104.177.197 1194
The message should show: Connection to 172.104.177.197 port [udp/openvpn] succeeded!
If not connected, that means either a firewall on client machine or your router is blocking access to the server. Make sure both client and server using same protocol and port, e.g. UDP port 1194.
Published on: 25-10-2022


