|
Managed web hosting services, VPS and dedicated servers offered since 2007.
WordPress Hosting plans with Daily Backups and e-Mail Accounts.
Live ChatSupport Center
Customer Login
|
How to Install mod_pagespeed Module on Apache Web Server
Pagespeed is the Apache module created by Google to help Make the Web Faster by rewriting web pages to reduce latency and bandwidth.
ModPagespeed should automatically be included in EasyApache 4 setup wizard, however if you're unable to find it, it can be easily installed on the cPanel servers and can be fully integrated with EasyApache 4 on WHM, so afterwards it is more then easy to run setup and compile Apache Web Server using graphical user interface. Before showing the practical part of this tutorial, let’s have a look what are the main benefits of using mod_pagespeed on the server:
- - Automatic website optimization.
- - Combine and minify CSS and Javascript code.
- - Image optimization, compression, and resizing.
- - Lazy load images.
- - Caching, domain sharding, and domain rewriting.
- - Move CSS above the scripts.
- - Move CSS to the document head.
-
How to install mod_pagespeed on CentOS based servers:
Simply follow the next steps using terminal on your Linux server:
1. Create the macros.apache2 file:
nano -w /etc/rpm/macros.apache2
2. Paste following content inside the file:
%_httpd_mmn 20120211x8664
%_httpd_apxs /usr/bin/apxs
%_httpd_dir /etc/apache2
%_httpd_bindir %{_httpd_dir}/bin
%_httpd_modconfdir %{_httpd_dir}/conf.modules.d
%_httpd_confdir %{_httpd_dir}/conf.d
%_httpd_contentdir /usr/share/apache2
%_httpd_moddir /usr/lib64/apache2/modules
3. Save the file and exit.
4. Install rpm-build package, along with some other modules required for the post EA4 compilation:
yum install rpm-build cpio ea-apache24-mod_version
5. Download the mod_pagespeed latest stable version:
wget https://github.com/apache/incubator-pagespeed-cpanel/raw/master/EA4/ea-apache24-mod_pagespeed-latest-stable.src.rpm
6. Build the mod_pagespeed module:
rpmbuild --rebuild ea-apache24-mod_pagespeed-latest-stable.src.rpm
7. Install Pagespeed module:
rpm -ivh /root/rpmbuild/RPMS/x86_64/ea-apache24-mod_pagespeed*.rpm
8. Restart Apache
/etc/init.d/httpd restart
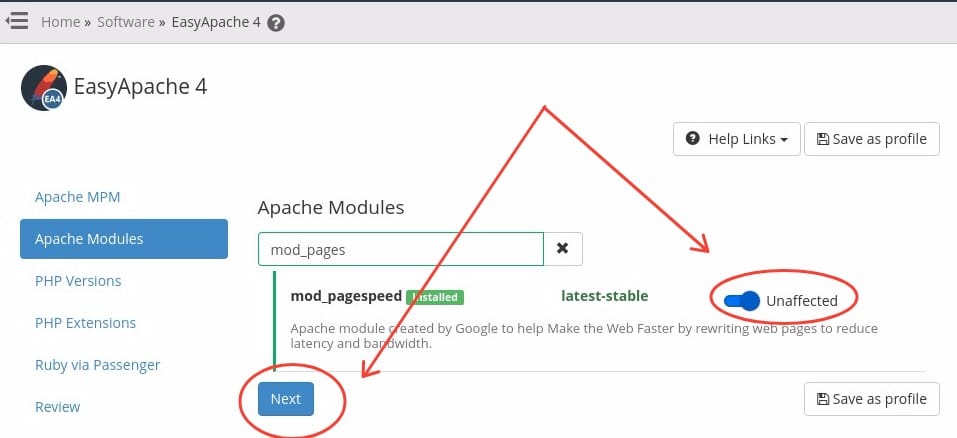
9. Now login to WHM control panel and go to Home > Software > EasyApache 4 and under Apache Modules click on mod_pagespeed to enable it as you see below:

10. Complete the process to have Mod_Pagespeed installed on your server.
- Configure mod_pagespeed Apache Module
This will have your mod_security installed, but that doesn’t mean it is fully configured to make your websites faster. In fact, there are tons of mod_pagespeed rules that you will need to apply to have the maximum possible performance.
The installation process will create a pagespeed.conf file located at this two possible paths:
- /usr/local/apache/conf/
- /etc/apache2/conf.modules.d
Refer to the official mod_pagespeed for further configuration and variables to use.
Published on: 27-07-2020


